Knitting a quick Holiday project - a Christmas stocking
Help! I need a quick project to make a christmas stocking for the fireplace. Here is a quick and simple knitting pattern for a Christmas stocking featuring a star pattern.
KNITTING
cartomay
11/22/20243 min read
Quick and simple knitting pattern for a Christmas stocking featuring a star pattern.
It was the summer of 1984 in Texas when I first knitted a Christmas stocking. As an Australian far from home, I found myself at a loose end (a pun?) until I met another Aussie expatriate named Joan, who would change my crafting journey forever. While most Texans were seeking refuge in air-conditioned spaces, we were happily working on our knitting projects with yarn and needles in hand.
I'll never forget when a Texas local , a non-knitter, approached me with an unusual request: to knit her a traditional Christmas stocking in festive reds and greens. The pattern was beautifully basic, perfect for beginners, much like the pattern I'm about to share with you today. It was my first attempt at a sock format and that stocking project taught me the basics of sock knitting. Joan, my fellow knitter ,probably helped me along the way but its so long ago I can’t quite remember if she did or not!
Today, I want to help you create your own knitted stocking that's perfect for beginners. Just like that Christmas stocking from my Texas days, this project proves that you don't need complicated patterns to create something special.
It's designed for Aran weight yarn and uses three colors
Materials
- Yarn: Aran weight yarn in three colors (e.g., red (MC), white (CC1), green (CC2)).
- Needles: Size US 8 (5 mm) circular or double-pointed needles.
- Stitch markers.
- Tapestry needle for weaving in ends.
Gauge - not critical, don’t worry about a swatch!
- 18 stitches x 24 rows = 4 inches in stockinette stitch
Finished Size
- Approximately 18 inches long and 7 inches wide (adjustable by changing needle size or yarn weight -again not critical)
Abbreviations
CO: Cast on
K: Knit
P: Purl
k2tog: Knit two stitches together
ssk: Slip, slip, knit
st(s): Stitch(es)
BO: Bind off
Instructions
Leg
1. CO 56 stitches with MC. Join to knit in the round, being careful not to twist. Place a stitch marker at the beginning of the round.
2. Cuff (Ribbing):
K2, P2 for 10 rounds.
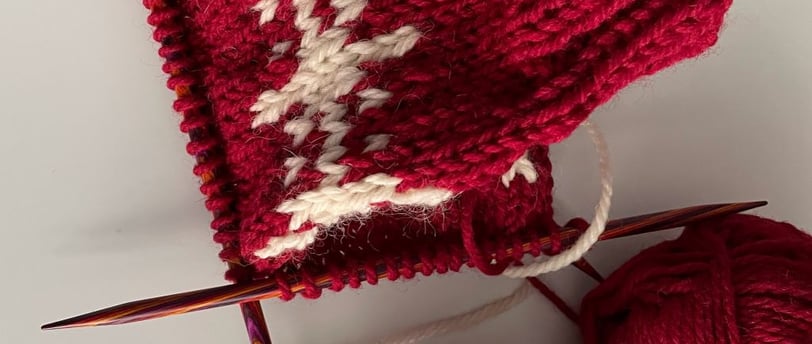
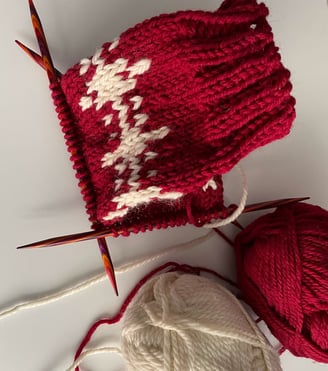
3. Star Pattern (work over 16 rounds):
- Begin using CC1 and follow the chart or written instructions for a simple 6-point star motif.
- Distribute stars evenly around the stocking (repeat the motif 7 times across the round).
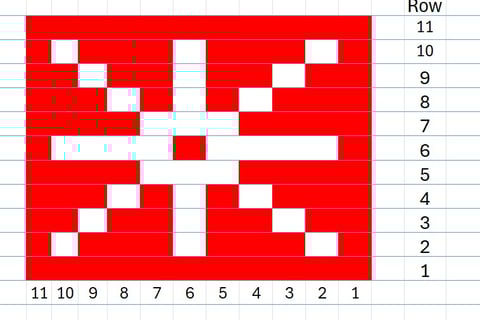
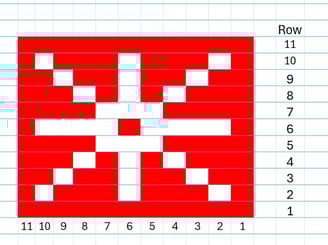
Charted Star Motif (repeat across round)
Each square represents one stitch; knit as per the chart pattern below.
Heel Flap
1. Divide work in half (28 sts for the heel, 28 for the instep).
2. Knit the heel flap flat in MC:
Row 1 (RS): Slip 1, K1 repeat to end.
Row 2 (WS): Slip 1, P to end.
Repeat for 24 rows (or 12 slipped stitches along the edge).
Turn Heel
1. Start on a RS row.
Row 1: Knit 15, ssk, K1, turn.
Row 2: Slip 1, P5, P2tog, P1, turn.
Repeat until all stitches are worked.
Gusset
1. Pick up 12 sts along each side of the heel flap. Knit across instep stitches, continuing the star pattern with CC1 and CC2.
2. Decrease gusset:
Round 1: Knit to 3 sts before instep, k2tog, K1. Knit across instep. K1, ssk, knit to end.
Round 2: Knit.
Repeat these rounds until 56 sts remain.
Foot
1. Continue knitting in MC, maintaining the star pattern on the top of the foot.
2. Knit until foot measures 1.5 inches less than desired length.
Toe
1. Switch to MC and shape the toe:
Round 1: K6, k2tog repeat to end.
Round 2: Knit.
Round 3: K5, k2tog repeat to end.
Round 4: Knit.
Continue decreasing in this manner until 8 sts remain.
2. Cut yarn, leaving a 6-inch tail. Thread tail through remaining stitches and pull tight to close. Weave in ends
Finishing
- Block lightly to shape. I would use a steam iron - using a damp cloth over the stocking - gently press.
- Add a hanging loop using a crocheted chain or I-cord in CC2.
Chart pattern - repeat 5 times for 56 stitches